Flutterでスワイプでリスト表示された要素の削除等ができるDismissibleの使い方
 Photo by Sven on Unsplash
はじめに
スマートフォンのメーラーアプリやToDoアプリなどでリスト表示された要素をスワイプして削除する機能などをよくみると思います。Flutterでは、Dismissibleを使うことでリスト表示されている要素に対するスワイプ操作に任意の処理を割り当てることができます。この記事では、このDismissibleの簡単な使い方をメモします。
できるようになること
以下のGIF画像のように、リスト表示された要素を右から左へ、左から右へスワイプさせることで要素を削除できます。また、スワイプ時のバックグラウンドのデザインや削除以外の任意の処理も割り当てることができます。
このデモのコードは以下のGitHubにあげてあります。
前提と環境
以下の通りです。
- Flutter 1.5.4-hotfix.2
- Dart 2.3.0
Dismissibleについて
上に載せたデモのような動作は、FlutterのDismissibleというウィジェットで定義されています。Dismissibleは別途パッケージをインストールする必要はなく、デフォルトで使用可能です。
以下がDismissibleの公式ドキュメントです。
The Swipe to dismiss pattern is common in many mobile apps. For example, ifwe're writing an email app, we might want to allow our users to swipe away emailmessages in a list. When they do, we'll want to move the item from the Inbox tothe Trash.Flutter makes this task easy...
A widget that can be dismissed by dragging in the indicated direction.
Dismissibleの使い方
使い方は非常に簡単です。
ListViewでウィジェットを作成するListViewの各リスト要素をDismissibleで包む
上記を実現するサンプルコードを以下に載せます。以下のようにListViewなどのitemBuilderの中で使用します。以下では、デモ用に適当なList型のデータをListViewで使用しています。各説明は以下のコード内のコメントに含めます。なお、全体のコードは冒頭に載せたGitHub上に載せています。
class DismissibleSampleState extends State{

  final List> items = [
    { "title" : "Title A",  "content" : "Content 1" },
    { "title" : "Title B",  "content" : "Content 2" },
    { "title" : "Title C",  "content" : "Content 3" }
  ];

  @override
  Widget build(BuildContext context) {
    return MaterialApp(
      home: Scaffold(
        appBar: AppBar(
          title: const Text('Dismissible Sample'),
        ),
        body: ListView.builder(
          itemCount: items.length,
          itemBuilder: (BuildContext context, int index) {
            final item = items[index];

            return Dismissible(
              // KeyはFlutterが要素を一意に特定できるようにするための値を設定する。
              key: Key(item["title"]),

              // onDismissedの中にスワイプされた時の動作を記述する。
              // directionにはスワイプの方向が入るため、方向によって処理を分けることができる。
              onDismissed: (direction) {
                setState(() {
                  // スワイプされた要素をデータから削除する
                  items.removeAt(index);
                });
                // スワイプ方向がendToStart(画面左から右)の場合の処理
                if (direction == DismissDirection.endToStart) {
                  Scaffold.of(context).showSnackBar(
                    SnackBar(content: Text("削除しました"))
                  );
                // スワイプ方向がstartToEnd(画面右から左)の場合の処理
                } else {
                  Scaffold.of(context).showSnackBar(
                    SnackBar(content: Text("登録しました"))
                  );
                }
              },
              // スワイプ方向がendToStart(画面左から右)の場合のバックグラウンドの設定
              background: Container(color: Colors.red),

              // スワイプ方向がstartToEnd(画面右から左)の場合のバックグラウンドの設定
              secondaryBackground: Container(color: Colors.blue),

              // ListViewの各要素の定義
              child: Card(
                child: ListTile(
                  leading: FlutterLogo(),
                  title: Text(item["title"] + " : " + item["content"]),
                ),
              ),
            );
          }),
        ),
      );
    }
  }
上記のコードでは、冒頭に載せたデモと少々異なり、スワイプ時のバックグラウンドの背景色やアイコンは定義していないため以下のようになります。
もしスワイプ時のバックグラウンドにアイコンを設置したりしたい場合は、例えば以下のように書きます。
(...以上省略...)
// スワイプ方向がendToStart(画面左から右)の場合のバックグラウンドの設定
 background: Container(
  alignment: Alignment.centerLeft,
  color: Colors.greenAccent[700],
    child: Padding(
      padding: EdgeInsets.fromLTRB(20.0, 0.0, 0.0, 0.0),
      child:  Icon(Icons.thumb_up, color: Colors.white)
    ),
 ),

// スワイプ方向がstartToEnd(画面右から左)の場合のバックグラウンドの設定
 secondaryBackground: Container(
   alignment: Alignment.centerRight,
   color: Colors.orangeAccent[200],
     child: Padding(
       padding: EdgeInsets.fromLTRB(10.0, 0.0, 20.0, 0.0),
       child:  Icon(Icons.thumb_up, color: Colors.white),
     ),
 ),
(...以下省略...)
上記のようにbackgroundとsecondaryBackgroundを書くと、冒頭に載せたデモのような見た目になります。
まとめ
このようなよく見る機能がデフォルトで用意されており、さらにドキュメントが充実しているのはFlutterのとても魅力的な点です。ここでは簡単なデモのみですが、スワイプ時の動作としてデータベースへのレコード挿入や削除機能を記述すれば、色々と応用が効きそうです。
関連記事
 公開日:2022/08/30 更新日:2022/08/30
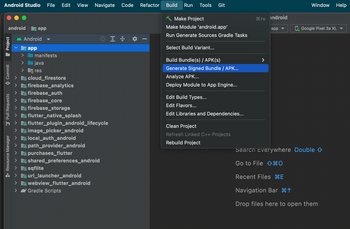
FlutterアプリでAndroid StudioのGenerate Signed Bundle/APKが表示されない時の対処法
FlutterアプリをGoogle Play Storeに公開するためにAndroid Studioを使ってアップロード鍵を生成しようとしたところ、公式ドキュメントに書かれている「Build」→「Generate Signed Bundle/APK」というメニューが見つかりませんでした。この解決法をメモします。
 公開日:2022/08/15 更新日:2022/08/15
webview_flutterを使ってFlutterアプリ内でWebページを開く
FlutterでURLをタップした時にアプリ内でそのURLのWebページを開く方法についてまとめます。この記事では、Flutter公式のプラグインであるwebview_flutterを使用した実装例をメモします。
 公開日:2022/08/14 更新日:2022/08/14
FlutterでURLへのリンクを作成してアプリ外でWebページを開く
FlutterでURLをタップしたらブラウザが開いてそこでURL先を表示したい場合があります。この記事では、Flutter公式のプラグインを使用した実装例をメモします。
 公開日:2019/12/03 更新日:2019/12/03
Android App Bundleを実機にインストールして試すために使うbundletoolの使い方
Flutterなどで開発したAndroidアプリを自分の手元にある実機にインストールして試したい場合はbundletoolを使用するよう公式ドキュメントに記載されています。ただ、常識であるためなのか詳しい使い方が書かれておらず戸惑ったのでメモしておきます。
 公開日:2019/12/02 更新日:2019/12/02
Flutterでアプリの復帰やサスペンドを検出して処理を実行する
Flutterで開発したアプリが復帰した時やサスペンドした時を検出して任意の処理を実行するための手順をまとめます。