自分専用の後で読むサービスを構築できる「Wallabag」をUbuntu + Nginxで構築する手順
はじめに
後で読むサービスのPocketにかなり近く、機能豊富なオープンソースのWallabagをUbuntuにインストールしたのでその手順をまとめます。 WallabagはPHPで開発されており、以下がWallabagの公式リポジトリです。MITライセンスです。
wallabag is a self hostable application for saving web pages: Save and classify articles. Read them later. Freely.
前提と環境
以下の通りとなります。
- OS : Ubuntu18.04
- PHP : 7.2 (7.2以上が必須)
- Composer : 1.9 (1.8以上が必須)
- MySQLやPostgresSQLがインストールされていること。
- NginxやApacheがインストールされていること。
Wallabagを使用するには、PHPとComposerがインストールされている必要があります。Composerのインストール手順については以下にまとめていますので必要な方は見てみてください。
phpのパッケージ管理システムであるComposerをUbuntu、Cloud Linuxの両方に入れる機会があったのでその手順をメモします。UbuntuとCloud Linuxで手順は同じです。また、グローバル、ローカルそれぞれにインストール手順もまとめます。
また、Wallabagの動作に必要なPHPの拡張機能がいくつかあり、これらは以下の公式ドキュメントに記載されています。
Wallabagをインストールする
WallabagをGitコマンドでクローンし、make installします。
$ git clone https://github.com/wallabag/wallabag.git
$ cd wallabag && make install
なお、make installを実行した時に以下のようなエラーが出る場合があるかもしれません。
$ make install
composer.phar not found, we'll see if composer is installed globally.
HEAD is now at 1aorie Release wallabag 2.3.8
Loading composer repositories with package information
Installing dependencies from lock file
Your requirements could not be resolved to an installable set of packages.

  Problem 1
    - The requested PHP extension ext-tidy * is missing from your system. Install or enable PHP's tidy ex
tension.
  Problem 2
    - Installation request for php-amqplib/php-amqplib v2.9.2 -> satisfiable by php-amqplib/php-amqplib[v
2.9.2].
    - php-amqplib/php-amqplib v2.9.2 requires ext-bcmath * -> the requested PHP extension bcmath is missi
ng from your system.
  Problem 3
    - php-amqplib/php-amqplib v2.9.2 requires ext-bcmath * -> the requested PHP extension bcmath is missing from your system.
    - php-amqplib/rabbitmq-bundle v1.14.4 requires php-amqplib/php-amqplib ^2.6 -> satisfiable by php-am$plib/php-amqplib[v2.9.2].
    - Installation request for php-amqplib/rabbitmq-bundle v1.14.4 -> satisfiable by php-amqplib/rabbitm$-bundle[v1.14.4].

  To enable extensions, verify that they are enabled in your .ini files:
    - /etc/php/7.2/cli/php.ini

    // 省略

GNUmakefile:21: recipe for target 'install' failed
make: *** [install] Error 255
上記は、エラー文に記載されている通り、いくつかのPHPの拡張機能がインストールされていないことが原因です。
上記の場合は、tidy、bcmathが不足していると書かれています。missingの前後に記載されているものが不足している拡張機能です。
従って以下をインストールします。なお、もしPHPのバージョンが7.3である場合は以下のphp7.2をphp7.3に置き換えて各自が使用しているPHPのバージョンに合わせてください。
$ sudo apt install php7.2-tidy php7.2-bcmath
改めて実行するとインストールが開始されます。
$ make install
インストールが進むと、以下について設定するよう順番に表示されます。
$ make install

// 省略

Generating optimized autoload files
> Incenteev\ParameterHandler\ScriptHandler::buildParameters
Creating the "app/config/parameters.yml" file
Some parameters are missing. Please provide them.
database_driver (pdo_mysql):
database_driver_class (null):
database_host (127.0.0.1):
database_port (null):
database_name (wallabag):
database_user (root):
database_password (null):
database_path (null):
database_table_prefix (wallabag_):
database_socket (null):
database_charset (utf8mb4):
domain_name ('https://your-wallabag-url-instance.com'):
mailer_transport (smtp):
mailer_host (127.0.0.1):
mailer_user (null):
mailer_password (null):
locale (en):
secret (slojoujf98s2o0t8ojlsd):
twofactor_auth (true):
twofactor_sender (no-reply@wallabag.org):
fosuser_registration (true):
fosuser_confirmation (true):
from_email (no-reply@wallabag.org):
rss_limit (50):
rabbitmq_host (localhost):
rabbitmq_port (5672):
rabbitmq_user (guest):
rabbitmq_password (guest):
rabbitmq_prefetch_count (10):
redis_scheme (tcp):
redis_host (localhost):
redis_port (6379):
redis_path (null):
redis_password (null):
上記が全てデフォルトの値の場合で良い場合は全てEnterを押していけばOKです。ただし、MySQLやPostgresSQLのユーザー名とパスワードが正しくないとインストールが失敗するので、事前に確認しておいてください。 なお、失敗すると以下のように表示されます。
$ make install

// 省略

Database connection      ERROR!   Can't connect to the database: An exception occured in driver: SQLSTATE[HY000] [1045] Access denied for user 'root'@'localhost' (using password: NO)

// 省略

GNUmakefile:14: recipe for target 'install' failed
make: *** [install] Error 1
一度失敗すると、そのままではmake installがうまくいかなくなります。もしインストールが失敗した場合は、wallabagフォルダの中にあるapp/config/parameters.ymlを編集します。
$ vi app/config/parameters.yml
app/config/parameters.ymlの中身は以下のようになっています。
This file is auto-generated during the composer install
parameters:
    database_driver: pdo_mysql
    database_driver_class: null
    database_host: 127.0.0.1
    database_port: null
    database_name: wallabag
    database_user: root
    database_password:
    database_path: null
    database_table_prefix: wallabag_
    database_socket: null
    database_charset: utf8mb4
    domain_name: 'https://your-wallabag-url-instance.com'
    mailer_transport: smtp
    mailer_host: 127.0.0.1
    mailer_user: null
    mailer_password: null
    locale: en
    secret: slojoujf98s2o0t8ojlsd
    twofactor_auth: true
    twofactor_sender: no-reply@wallabag.org
    fosuser_registration: true
    fosuser_confirmation: true
    from_email: no-reply@wallabag.org
    rss_limit: 50
    rabbitmq_host: localhost
    rabbitmq_port: 5672
    rabbitmq_user: guest
    rabbitmq_password: guest
    rabbitmq_prefetch_count: 10
    redis_scheme: tcp
    redis_host: localhost
    redis_port: 6379
    redis_path: null
    redis_password: null
上記のうち、必要な部分を自分の環境に合わせて設定してください。少なくともdatabase_user、database_password、domain_name等は変更が必要だと思います。
app/config/parameters.ymlを自分用に編集したら再度make installを実行します。
インストールがうまく進むと、Wallabag用のユーザーアカウントを作成するよう表示されるので、Usernmae(ユーザー名)、Password(パスワード)、Email(メールアドレス)をそれぞれ入力してください。
$ make install


Step 3 of 4: Administration setup.
----------------------------------

 Would you like to create a new admin user (recommended)? (yes/no) [yes]:
 > yes

 Username [wallabag]:
 > admin

Password [wallabag]:
 >

 Email []:
 > admin@your-domain.com

Administration successfully setup.

Step 4 of 4: Config setup.
--------------------------

 Config successfully setup.


 [OK] Wallabag has been successfully installed.


 [OK] You can now configure your web server, see https://doc.wallabag.org
最終的に上記のように表示されればWallabagのインストールが完了です。
Nginxの設定ファイルを作成する
WallabagはWebアプリケーションとして動作するので、NginxやApacheがインストールされている必要があります。ここではNginxを使用します。なお、Wallabag用のNginx、Apacheの設定ファイル例についてはこちらの公式ドキュメントに記載されています。
私はWallabag用の設定ファイルとしてwallabag.confを新たに作成し、以下のようにしました。Let's Encryptを使用しています。
server {
    listen 80;
    # 各自の独自ドメインを指定
    server_name example.com;
    return 301 https://$host$request_uri;
}
server {
    listen 443 ssl;
    # 各自の独自ドメインを指定
    server_name example.com;

    # 各自のwallabagディレクトリのパスを指定
    root /home/username/wallabag/web;

    ssl_protocols TLSv1 TLSv1.1 TLSv1.2;
    ssl_prefer_server_ciphers on;
    ssl_ciphers "EECDH+ECDSA+AESGCM:EECDH+aRSA+AESGCM:EECDH+ECDSA+SHA256:EECDH+aRSA+SHA256:EECDH+ECDSA+SHA384:EECDH+ECDSA+SHA256:EECDH+aRSA+SHA384:EDH+aRSA+AESGCM:EDH+aRSA+SHA256:EDH+aRSA:EECDH:!aNULL:!eNULL:!MEDIUM:!LOW:!3DES:!MD5:!EXP:!PSK:!SRP:!DSS:!RC4:!SEED";

    add_header Strict-Transport-Security "max-age=31536000";
    # 各自のLet's Encryptのパスを指定
    ssl_certificate /etc/letsencrypt/live/example.com/fullchain.pem;
    ssl_certificate_key /etc/letsencrypt/live/example.com/privkey.pem;

    location / {
        # try to serve file directly, fallback to app.php
        try_files $uri /app.php$is_args$args;
    }
    location ~ ^/app\.php(/|$) {
        # if, for some reason, you are still using PHP 5,
        # then replace /run/php/php7.0 by /var/run/php5
        # fastcgi_pass unix:/run/php/php7.0-fpm.sock;
        # 各自の環境は合わせて置き換えること
        fastcgi_pass unix:/var/run/php/php7.2-fpm.sock;
        fastcgi_split_path_info ^(.+\.php)(/.*)$;
        include fastcgi_params;
        # When you are using symlinks to link the document root to the
        # current version of your application, you should pass the real
        # application path instead of the path to the symlink to PHP
        # FPM.
        # Otherwise, PHP's OPcache may not properly detect changes to
        # your PHP files (see https://github.com/zendtech/ZendOptimizerPlus/issues/126
        # for more information).
        fastcgi_param  SCRIPT_FILENAME  $realpath_root$fastcgi_script_name;
        fastcgi_param DOCUMENT_ROOT $realpath_root;
        # Prevents URIs that include the front controller. This will 404:
        # https://domain.tld/app.php/some-path
        # Remove the internal directive to allow URIs like this
        internal;
    }

    # return 404 for all other php files not matching the front controller
    # this prevents access to other php files you don't want to be accessible.
    location ~ \.php$ {
        return 404;
    }
    error_log /var/log/nginx/wallabag_error.log;
    access_log /var/log/nginx/wallabag_access.log;
}
なお、上記の中でfastcgi_pass unix:/var/run/php/php7.2-fpm.sock;と指定していますが、これは各自の環境に合わせて変更してください。ここが間違っていると、後ほどブラウザからWallabagにアクセスしてみても、「502 Bad Gateway」とエラーがでます。また、/var/log/nginx/wallabag_error.logにもエラーとしてログされるので確認してみてください。
Nginx用に権限を変更する
クローンしたWallabagのディレクトリ全体を、Nginxが扱えるように権限を変更しておきます。Apacheの場合はwww-dataになると思います。
$ sudo chown -R nginx:nginx wallabag
以上でNginxを起動します。
$ sudo service nginx start
Wallabagにアクセスする
Wallabagがインストールされて起動していれば、Nginxの設定ファイルで指定したドメイン名にブラウザからアクセスすると以下のようにWallabagのログイン画面が表示されます。
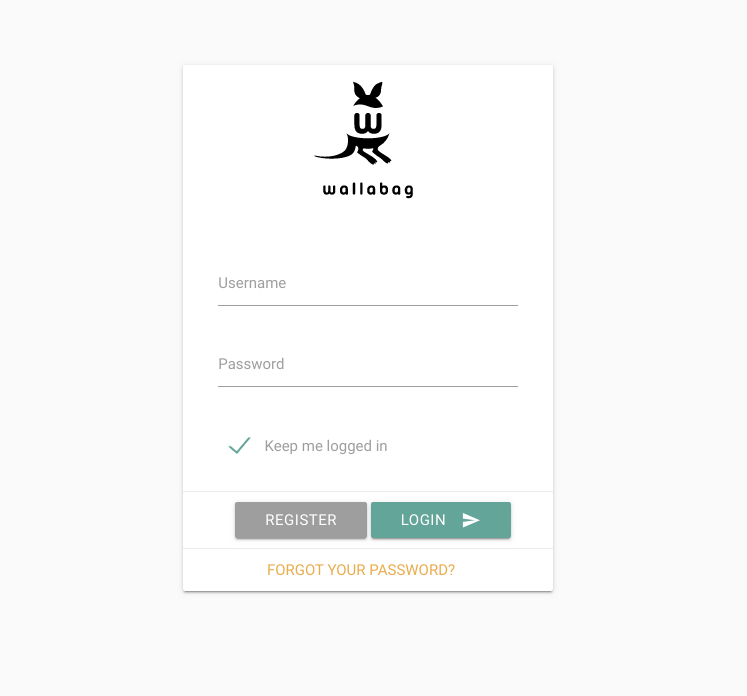
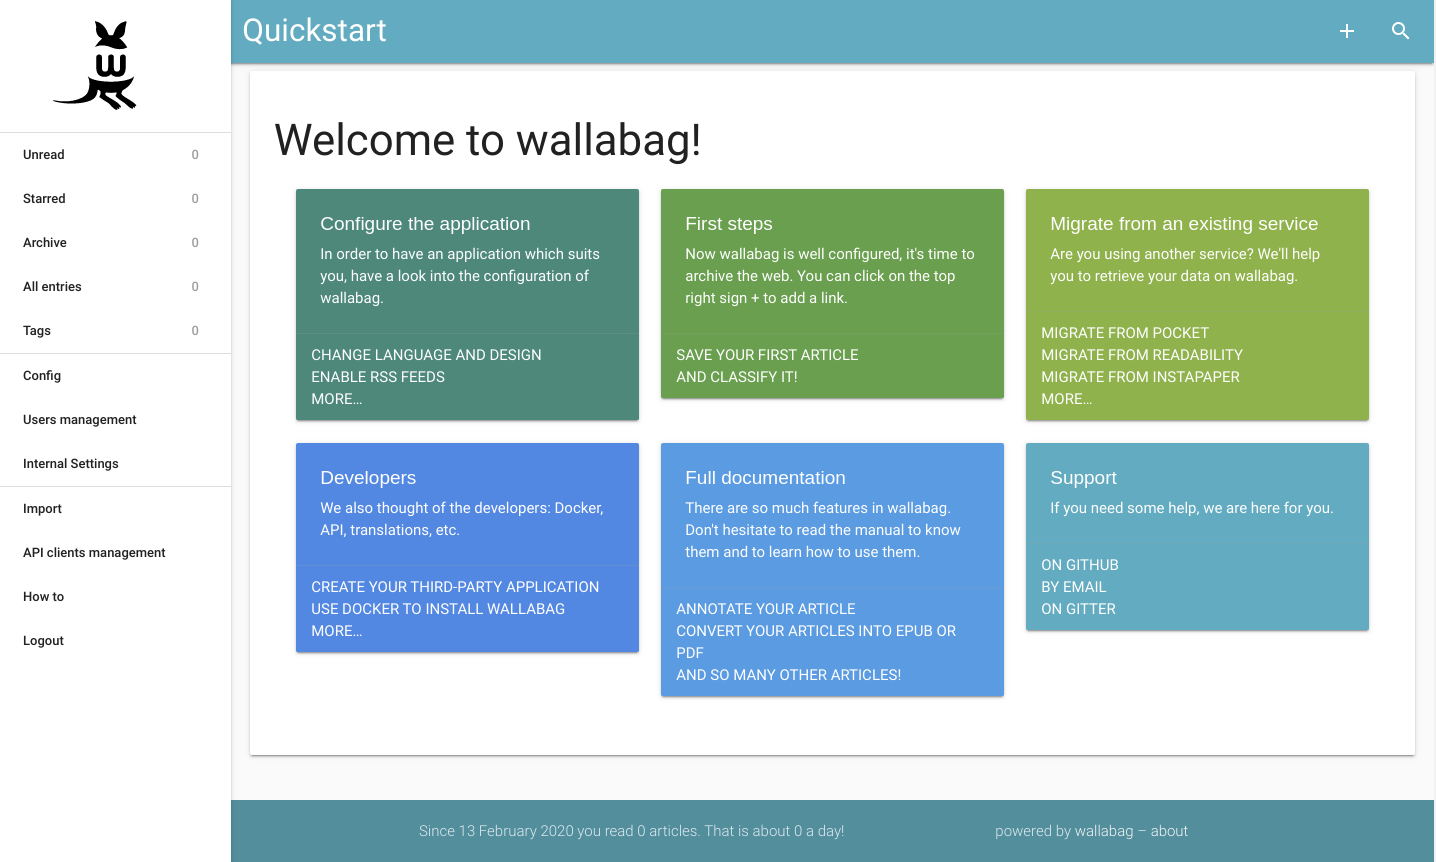
上記のログイン画面では、Wallabagのインストール中に入力したユーザー名とパスワードを入力してログインします。 ログインできると以下のようにダッシュボードが表示されます。
Wallabagのクライアントアプリを使用する
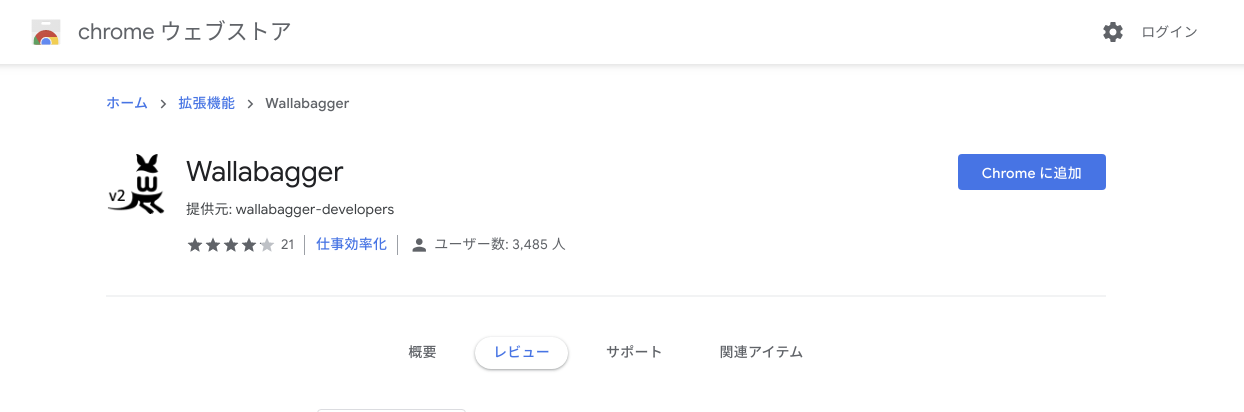
後は好きな方法で後で読みたいページをWallabagに追加します。Wallabagでは、Google ChromeやFireFox用の拡張機能、iOSやAndroid用のアプリが配布されています。例えばGoogle Chrome用の拡張機能はChromeストアからインストールできます。
後はWallabagの拡張機能の設定で自分のサーバーのURLを入力し、さらにクライアント用のIDやシークレットを入力します。
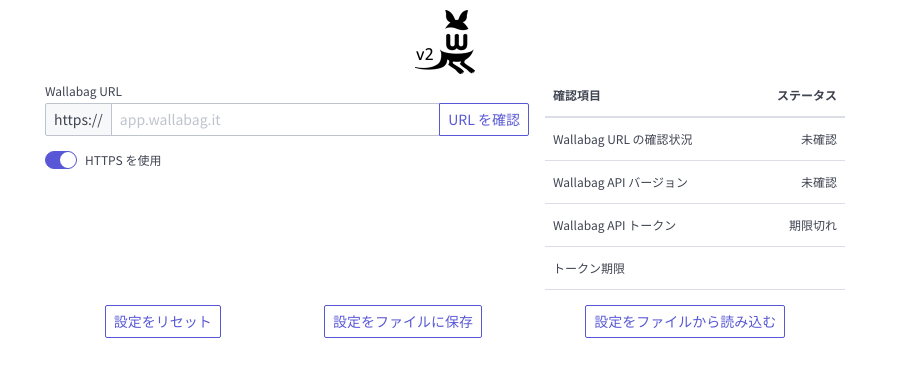
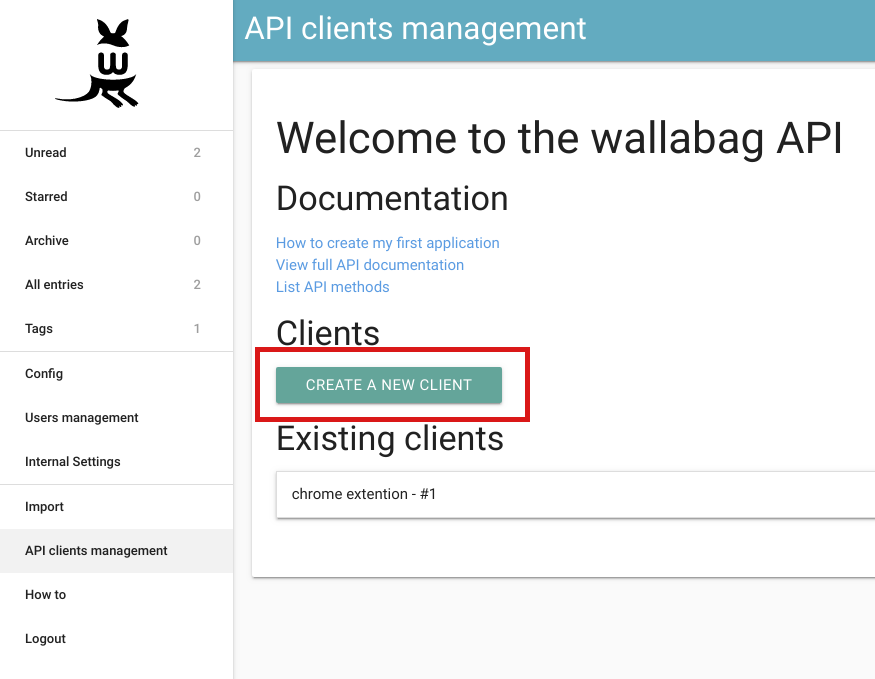
なお、クライアント用のIDやシークレットは、Wallabagのダッシュボードにある「API clients management」→「CREATE A NEW CLIENT」から作成します。
まとめ
Wallabagのインストール手順と使い方をまとめました。
関連記事
 公開日:2020/03/23 更新日:2020/03/23
指定したURLのWebページをPDF、PNG化してくれるAPIサーバー「URL to PDF Microservice」の使い方
特定のWebページをPDF化したりPNG化してダウンロードしたい場合に使える「URL to PDF Microservice」というリポジトリが公開されており、実際に使ってみたのでその手順をまとめます。「URL to PDF Microservice」は自分のサーバーにインストールして使用できます。
 公開日:2020/02/16 更新日:2020/02/16
圧縮、暗号化、リモート対応の差分バックアップを作成できる「Borg Backup」の使い方
圧縮、暗号化に対応し差分バックアップを作成できるソフトウェアである「Borg Backup」をUbuntuにインストールして使ってみたのでその手順をまとめます。「Borg Backup」はLinux、macOSに対応しています。
 公開日:2020/02/13 更新日:2020/02/13
モダンで美しいRSS&ポッドキャストリーダー「Winds」をUbuntuで使用する
RSSリーダーアプリは色々ありますが、結構見た目が古く更新されていないものも多いです。Windsはモダンな見た目で綺麗な上、WebサイトのRSSフィードだけでなくポッドキャストのフィードにも対応しています。この記事ではWindsをUbuntuにインストールして使用する手順をまとめます。
 公開日:2020/02/12 更新日:2020/02/12
ファイル単位で暗号化して保存できるCryptomatorをインストールして使う手順
Cryptomatorは、ファイル単位での暗号化が可能なソフトウェアです。この記事では、UbuntuにCryptomatorをインストールする手順と使い方をまとめます。